The Project Interface
When you open a project, you'll see Inkweld's project interface. Let's explore each area and how they work together.
Overview
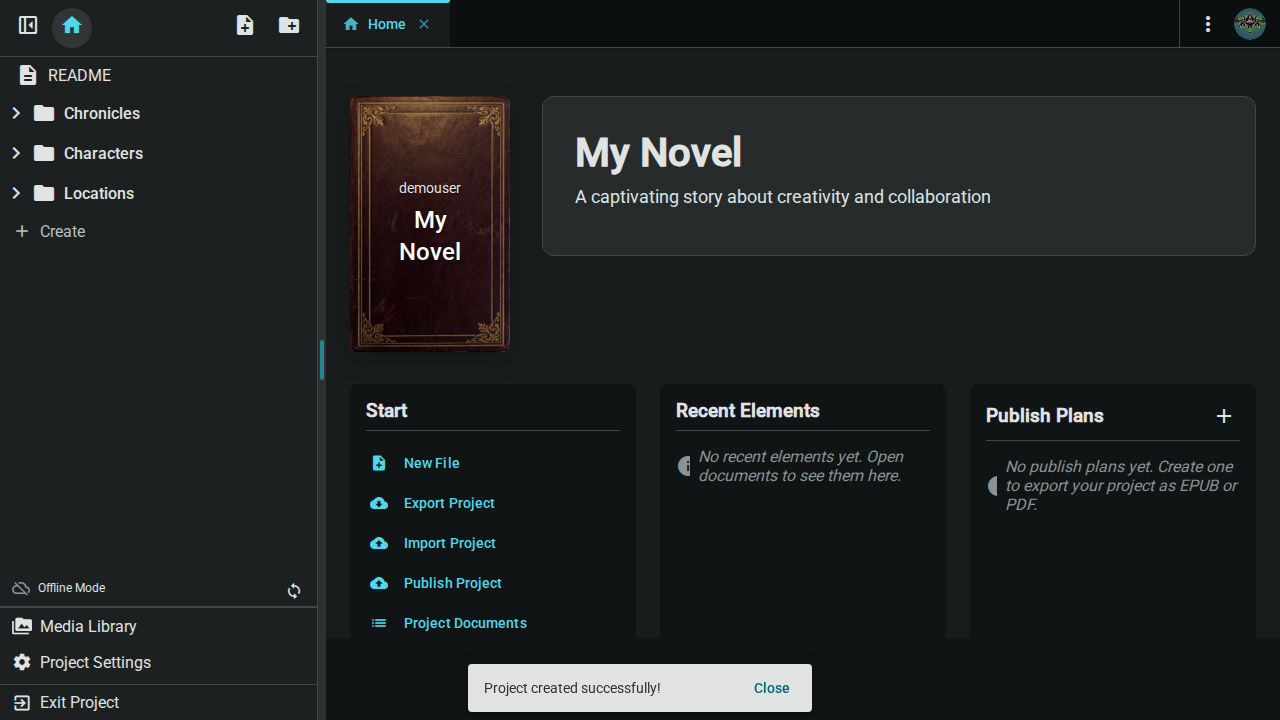
The interface is divided into three main areas:
- Tab Bar (top) — Navigate between views including the home tab and open documents
- Project Navigator (left) — Browse your project's structure
- Content Area (center) — View and edit content
The Tab Bar
The tab bar runs across the top of the interface and provides navigation between different views.
Home Tab
The first tab (with a home icon) takes you to the Project Home page, which displays:
- Project header — Cover image, title, and description (click to edit)
- Start actions — Quick buttons for common tasks like creating files or exporting
- Recent elements — Documents you've opened recently for quick access
- Publish plans — Manage your EPUB/PDF export configurations
Document Tabs
When you open documents, they appear as additional tabs. You can:
- Click a tab to switch between open documents
- Click the X on a tab to close it
- Middle-click a tab to close it quickly
- Right-click a tab for more options
Tab Context Menu
Right-click any tab to access the context menu:

- Rename — Rename the element directly from the tab (only appears for documents, folders, and worldbuilding elements)
- Close — Close this tab
- Close to Right — Close all tabs to the right of this one
- Close Others — Close all other tabs except this one
- Close All — Close all open tabs
Toolbar Actions
On the right side of the tab bar, you'll find:
- More menu (⋮) — Additional actions like export, import, and project deletion
- User menu — Access your account, settings, and logout
Project Navigator
The left sidebar shows all elements in your project as a collapsible tree.
Element Types
| Icon | Type | Description |
|---|---|---|
| 📁 | Folder | Container for organizing other elements |
| 📄 | Document | Text content for chapters, scenes, notes |
| 🏷️ | Worldbuilding | Structured entries using templates (characters, locations, items, etc.) |
:::tip Worldbuilding Elements All worldbuilding entries—characters, locations, items, and more—are built from customizable templates. You can modify existing templates or create entirely new ones with custom fields and icons. See Worldbuilding Elements for details. :::
Navigator Actions
- Click an element to open it in a new tab
- Drag and drop to reorganize elements
- Right-click for context menu (rename, delete)
- Click the chevron to expand/collapse folders
Navigator Toolbar
At the top of the navigator, you'll find:
- Home button — Return to the project home tab
- New Document — Create a new document at the root level
- New Folder — Create a new folder at the root level
Bottom Navigation
At the bottom of the navigator, you'll find quick access to:
- Media Library — Manage project images and files
- Project Settings — Configure project options
- Exit Project — Return to the bookshelf
User Menu
The user menu appears in the top-right corner of the interface. Click your avatar (or initials) to access:
- Messages — View system announcements
- Settings — Configure application preferences (connection, display options)
- Admin — Access admin dashboard (if you're an administrator)
- Logout — Sign out of your account
Mobile Layout
On mobile devices, the interface adapts for touch:
- Hamburger menu opens the project navigator as a slide-out panel
- The navigator includes all navigation options in one place
- Swipe or tap the backdrop to close the panel
- The content area takes the full screen width
Next: Managing Documents - Create, edit, and organize your writing documents.