Timeline
The Timeline element gives your story a plottable chronology. Drop events onto named tracks, group stretches of history into coloured eras, and do it all against either the real‑world Gregorian calendar or a bespoke fantasy calendar of your own design.
Creating a Timeline
- Right‑click in the Project Tree sidebar (or click the + button)
- Select New Timeline
- Give it a name (e.g., "Main Timeline", "Villain Arc", "Age of Empires")
The timeline opens immediately in its own project tab. If you haven't installed any time systems yet, the toolbar will prompt you to install one — see Time Systems below.
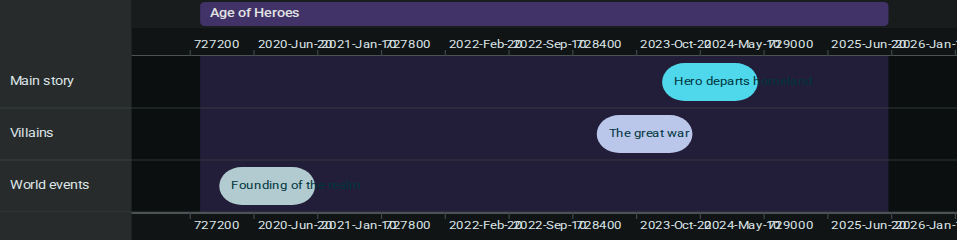
The Interface
| Area | Purpose |
|---|---|
| Toolbar (top) | Time system picker, add event / track / era, zoom + fit |
| Top band (sticky) | Era header strip and the top dateline |
| Tracks area (middle, scrollable) | Named lanes holding events and era bands |
| Bottom band (sticky) | Bottom dateline mirroring the top axis |
The top and bottom timeline bands stay pinned while you scroll vertically through tracks, so you never lose your sense of when you're looking at.

Time Systems
A time system defines the calendar your timeline uses. Inkweld ships with a Gregorian system, and your project can install additional systems — including fantasy calendars with any number of subdivisions (e.g., cycles / moons / nights, ages / seasons / days).
Picking a system
Use the Time system dropdown in the timeline toolbar to switch between installed systems. Each timeline element remembers its own selection.
Installing or designing a system
Open Settings → Time Systems on your project to install or design systems. A designed system lets you name its units, set subdivision sizes (e.g., 13 moons of 28 nights), and define a display format like C{u0} M{u1} N{u2}.
The Worldbuilding demo project ships with the Moonveil Reckoning fantasy calendar as an example.
Tracks
Tracks are horizontal lanes that group related events — one track for main‑story beats, one for villain movements, one for background world events, and so on.
| Action | How |
|---|---|
| Add a track | Click Add track in the toolbar; you'll be prompted for a name |
| Rename a track | Click the track's label in the left column; the prompt pre‑fills the current name |
Tracks span the full width of the timeline and are visually separated by horizontal dividers. The left‑column surface is slightly elevated so labels stay legible against ticks and events.
Events
Events are the beats of your story. Each event belongs to a track and has a start date (and optional end date to span a range).
Adding an event
- Click Add event in the toolbar
- Fill in the title, pick the track, and enter a start date in the active time system's format
- Optionally flip Ranged on and enter an end date
- Click Save
The pill appears on the chosen track at the right horizontal position. A single‑instant event renders at a minimum width; ranged events grow with their duration.
Editing or moving an event
- Click an event pill to re‑open the editor dialog — useful for renaming, changing track, or adjusting the description
- Drag the body to move the event along its track
- Drag an edge handle to resize a ranged event
Edits persist as you go — there's no explicit save step.
Eras
Eras are coloured bands spanning a range of time across all tracks. Use them to mark off big chunks of history ("The First Age", "Pre‑war era", "Dreamtime") so a reader can see context at a glance.
| Action | How |
|---|---|
| Add an era | Click Add era; pick a start, end, name, and colour |
| Move an era | Drag the era body left or right |
| Resize an era | Drag either edge handle |
| Edit / delete | Click the era body to re‑open the dialog |
Era labels appear in the top band, so you can always see which era contains the portion of the timeline you're viewing.
Navigation
| Control | Description |
|---|---|
| Zoom in | Tighten the visible tick span |
| Zoom out | Widen the visible tick span |
| Fit contents | Frame all events and eras in view |
| Wheel / trackpad | Scroll to pan horizontally, pinch or hold Ctrl to zoom |
| Drag the axis | Click‑drag empty space on the dateline to pan |
Tips
- Start with one or two tracks and add more as your chronology grows more complex
- Use eras for context, not as a substitute for events — a "War" era might contain many individual event pills
- Colour‑code tracks by meaning (protagonists, antagonists, world events) so the timeline reads at a glance
- Pick your time system before adding many events — switching systems on a populated timeline is allowed, but events authored in the old system won't automatically re‑anchor to the new one
- Refresh anytime — your timeline is saved automatically and comes back exactly as you left it
Previous: Canvas — Freeform infinite canvas for maps and diagrams.